

Feathering Vs. Blending Vs. Wet Blending, understanding the differences
Greetings everyone:

I was going to post an article today about the differences between blending and the more common wet blending. I wanted to talk about this because although wet blending is a very common technique, no one out there (on the forums, etc) seemed to be talking about just basic BLENDING.
To be clear, when I say blending, I mean the gradient disolve between colors used to create a soft transition. Think of a sunset, and the way the light changes from dark red to orange to yellow, then to pink, etc. That’s blending, I guess on the biggest pallete there is.
Blending is seen as an advanced technique by most painters, since it’s such a time consuming endeavor (and we are NOT a patient world). I hear people talk about Wet Blending all the time (which is actually less like blending and more like speed layering or muddling colors), I think because it achieves a ‘similar’ effect in much less time. Which I’m all for, btw! Anything to save time.
That being said I think it’s important to remember WHAT blending actually is and how it is done, at least for posterity if nothing else. In effect, feathering and blending get confused all the time. Feathering is, in essence, thinnly drawing out the edge of a highlight color so that it blends against the underlying surface, in effect creating a thin, transparent surface layer. So in a way, it’s partially layering, but really, because the color is so thin and the edge is so soft, it actually becomes more of a gradient color transition.
To be clear, Feathering is Blending. The two terms are virtually identical and can be used interchangeably. Even though Feathering is how you blend, it’s a little like saying driving is how you drive. Their two paths to the same destination and riding in the same damn car. Who cares who’s driving?
I had to go all the way back to my trust “How to Paint Citadel Miniatures” Guide to find out more about this, (the old version, not the shiny new version with the spiral bound center). Page 32, 2nd Paragraph down for those interested. This is the one written by Rick Priestly.
On the next page, (page 33, just under the “Metallics” sidebar) Rick makes several notes of interest:
Firstly, he points out that in order to blend effectively you need two brushes: One to apply paint and one to smooth the paint. The 2nd brush should always be a little wet (with water). This is to prevent it from soaking up the paint. It’s meant to drag the paint around, not soak it up. Both brushes should be small and well pointed (firm bristles will help to draw out the paint thinly across the surface of the model). You want to work in small areas at a time, so that the paint doesn’t dry up on you. Of course on a bigger model, use a bigger brush. Thinning the paint properly (a feat of it’s own and deserving another article) will help in this regard. It should be about glaze consistency.
Secondly, he points out that the more common practices of washing and layering achieve, in effect, the same result in much less time. Hence why they are favored so much. So he honors the old technique while recognizing the value of the new.
He also makes a comment, and I’ll quote here, that “The appearance of an army depends much more on the artist’s sense of style and colour than upon time consuming technique. The ability to blend does not in itself make an expert painter!” Page 33, How to Paint Citadel Minaitures. (PS, check out Rick’s tip about blending out extreme/line highlights on page 42.
Rather than post a few pics of me holding a brush over a mini demonstrating the technique, I thought I’d show you a few of my favorite examples of the technique in action from the REAL pros out there. These are the guys that inspire me.
Studio McVey should be familiar to most painters. He was one of the founding painters for Eavy Metal back in the day and hasn’t slacked off since. He doesn’t have a very active youtube channel BUT he posted what I consider to be the absolute 100% best videos on blending I have every seen.
Here is a link to the first video in the series.
Another guy whose work I really like is Andrew with Schnauzer Face Minis. His website is still a WIP, mostly because of his hectic life, but he’s really an inspiration in terms of blending with an airbrush. The beauty of an airbrush, other than the chrome body (hubba hubba) is that it effectively blends with every blast. Because the paint is atomized, it is very thin (like paint used to blend). Additionally, because of the way the paint is dispersed when it comes out of the airbrush, it can’t help but thin out towards the edges of the cone.
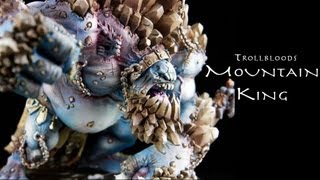

This means, among other things, that wherever you spray will have a softer edge than the concentrated center. This is exactly what you want when you blend, and you get this just by hitting the easy button with an airbrush!
Check out Andrew’s amazing Trollblood Mountain King Tutorial for a great example of this in action. Andrew makes it look so easy. Jealous? Yes, yes, I am.
 For a good example of Wet Blending in action, check out this tutorial by Lester Burley of Awesome Paint Job. There area about a million tutorials on how to wet blend out there, but I like how Les goes into great deal of detail about it and you can really see it in up close detail in this video.
Just so we’re on the same page, layering is something ENTIRELY DIFFERENT than blending. I’ll get more into layering in a future video, but if you want a good example of Layering in action, check out Goatboy’s extensive gallery. From a distance (like standing up at a gaming table) layering looks just as nice as blended miniatures and its MUCH faster, so it’s no wonder why layering is such a popular technique.
Goatboy’s layering is pretty much an extension of the way he does graphic art. His colors are very distinct and easy to separate with the naked eye, but from a few feet away, the colors appear to blend perfectly. That’s what good layering should do. All the beauty of feathering in half the time.
Check out the art he did for our podcast, War Council. If you want to give them a listen you’ll be able to here soon.

To round things out, I found an amazing forum chat (very brief, thankfully) that I will summarize below, as well as provide a link to. I have credited the authors beneath each section, at least as much as I could based on their handle.
http://warhammer.org.uk/phpBB/viewtopic.php?f=6&t=66579
FORUM POST BEGINS HERE:
Blending is not hard and there’s no real secret, it’s just time consuming and you’ve got to practise to find a way that works for you. I only use one brush and tend to suck the paint off, only occasionally dipping it in water. Sometimes I use very thinned paint, sometimes I don’t. It’s a matter of what suits that particular colour / paint.
A few tips are:
Thin your paint, it definitely helps. If a paint is translucent it makes the boundary easier to feather.
Make sure the second coat of paint is a natural shade/highlight of the basecoat. There’s no universal rule as to what works (although adding black/white is invariably a natural tone if not the most aesthetically pleasing one), but it does help a lot to make the colour transition more “forgiving”.
Experiment with what colours are translucent and may blend easier.
Experiment with different ways of feathering the boundary to find what works for you. A non-tiny brush can help with this.
Maybe a dash of arrogance.
They think they’re inventing them.
One thing to consider before you even start is what your aim is.
You can spend many hours on a figure carefully blending everything or half an hour not…
And it looks pretty much the same on the table.
There are a number of techniques to get a graded transition.
Some are better suited to large flat surfaces than others.
Then there are also different types of paints.
If you use multiple thin layers ( arguably trading time for skill ) then you want fast drying paints that handle being thinned really well. P3. Or translucent paints like colour party.
Wet in wet. You wet the area with a thin film and then apply paint to one side of the wetted area. It then blends itself by the paint levelling since the further away from your stroke, the less colour will percolate. Getting the balance of water on the figure to on the brush is critical.
Softening. You paint the paint on and then remove it with a wet brush whilst wet. This is quite similar to feathering but you’re working parallel to the original stroke rather than flicking across it.
Quicker but again skill is required to get the loading on the brush right.
For feathering you want slow drying and adding slow drying medium also means the paint is more translucent but with more bulk for your feathering brush to catch.
I use a second coarse brush to feather because it’s faster. Coarse because that adds texture and I rarely want a very smooth finish. They’re harder because any imperfection stands out and largely unnatural anyhow.
_________________
I am not sure what this technique would be called (layering?) but if you make a mistake, you just go back to your palette and can easily correct it because the color is right there. You can make the transition as smooth or stark as you want depending on how much time and effort you put in.
I find that this works for me because even with extenders my paint dries on my model immediately ( I must be doing it wrong) so any of the wet techniques on the model I just can’t get to work.
_________________
If paint drying is a particular problem then you could consider using atelier interactive.
They have a long open time without any extender and work rather like oils even though they’re acrylic.
For a while after they’re touch dry you can whack some water on, mix and they re-open.
There’s a special extender for them which can mkeep them workable for up to 24 hours or so.
There’s also some stuff that re-opens them even when they’re completely dry.
Because of all these weird properties there are odd things you can do like mix on the figure.
You can also mix with regular acrylics and they still remain open somewhat longer.
Andy O’Neill,
August 2, 2013 @ 12:15 pm
this is one of the most intelligent and comprehensive articles i’ve read thus far on blending. kudos to you for giving credit to both studio mcvey and andrew’s airbrush work which i only recently discovered. in regards to good examples of layering, you should also check out paintedgoblin’s web site – i love the chunky and intentional layers which viewed from your typical tabletop distance blend together beautifully. i’ll have to dig up that old copy of how to paint citadel miniatures (thank you scribd.com!!!) to read your posted reference
March 11, 2018 @ 6:28 pm
Wonderfully written article on blending, layering and feathering. Short, sweet and to the point. Old techniques remain the same whatever name today’s society cares to use.
Sometimes I find myself beginning to blend on the pallette then continue this on the models making even more subtle transitions. It depends if I am going for table top or conversation piece.
It is so true about the artists sense of style and color for a piece to display on either the table or showcase.
Thanks for a good read!